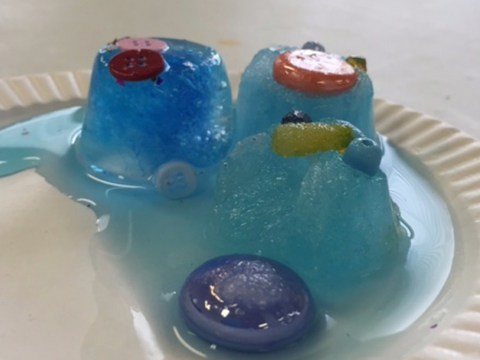
Try these wintery experiments at home for some Frozen Science fun! Adult supervision recommended.
1. Ice Castles
Supplies: small cups or containers, water, food coloring, glitter, sequins, salt or sugar
Instructions:
Make some beautiful ice castles by adding drops of blue food coloring to water.
Place a few pieces of glitter, sequins etc, into each cup. Vary what your ice castles will look like!
Freeze overnight.
Try melting your castle by making it “snow”. Pour on a few sprinkles of salt or sugar on your castles.
Make predictions. What will happen? Which if any, will make the ice melt faster?
Why it works: both salt and sugar are crystals that can lower the freezing point of water, making ice melt faster. What this means is the surrounding temperature must now be colder to keep ice in a solid state.
2. Crystals
Supplies: jar, Epsom salt, food coloring, spoon
Instructions:
Make a supersaturated solution that will grow crystals!
Adult: fill a jar with ½ cup very hot water (not boiling).
Add ½ cup Epsom salt and stir.
Add a few drops of food coloring if desired.
Stir for 2 minutes and place jar in the fridge for several hours.
Crystals should form in needle-like structures.
Why it works: The salt will dissolve in the water. This new mixture of water and dissolved salt is called a solution. Salt will dissolve faster in warmer water because it has faster moving molecules which are spread further apart than the molecules in the cold water. When no more salt can dissolve in the water it is a supersaturated solution.
3. Snow Globes
Supplies: water, glitter, clean empty jar with lid, glycerin, rubber cement or silicone adhesive, action figure or finger puppet or other small toy.
Instructions:
Make fun snow globe! Glue action figure or puppet onto jar lid with adhesive.
Fill the jar with water and add glitter or confetti.
Add a few drops of glycerin.
Seal on the lid with adhesive.
Shake to make it snow!
Why it works: A snow globe is a representation of a real snowstorm but in the water. We added a chemical called glycerin which will make the water more dense and allow the “snow” in our snow globes to fall a bit slower in the water for a nice wintery effect.
4. Winter Wonder Slime
Supplies: white or clear glue, blue food coloring, fine glitter, liquid starch, small cups, spoons, mint extract (optional)
Instructions:
This needs to be done VERY slowly for best results – have patience! It will take about 10 minutes.
Fill a small cup about ½ way with glue.
Stir in some fine glitter and mix well with a spoon.
Add a few drops of food coloring. Mix well.
Slowly add about 1 tsp liquid starch and stir.
For more winter fun, add a few drops of mint extract for a seasonal smell!
Keep slowly adding starch until you have a good consistency (not too stiff and not too slimy). Pick it up and play with it in your hands. If it is still too sticky add a bit more starch.
The more you play with it, the better it works!
Why it works: slime is very interesting because it is a colloid, a substance that can act like a solid and a liquid at the same time! They appear to be solid but flow like liquid. Like our slime, colloids are made up of tiny solid particles suspended in liquid.
5. Spinning Snowman
Supplies: several ping pong balls, glue gun, markers, old CD, stickers

Instructions:
On one ping pong ball, draw a snowman face with markers.
On a second ball, draw black buttons.
Glue the head and body (with buttons) together. Set aside for a few minutes to dry.
Decorate an old CD with stickers or markers. The CD in the example is clear, but if you get a regular shiny one have any writing facing down.
Stick final ball to CD.
Give your snowman a spin! He may be wobbly then right himself!
Why it works: when a top is spun, it will keep spinning because of inertia, or the tendency of an object to keep moving in a continuous direction.


